
Créer une base solide pour votre Phoenix Dome est essentiel pour garantir la stabilité, le confort et la durabilité. Voici quelques considérations générales et options pour la construction de plateformes, adaptées aux divers besoins de nos clients.
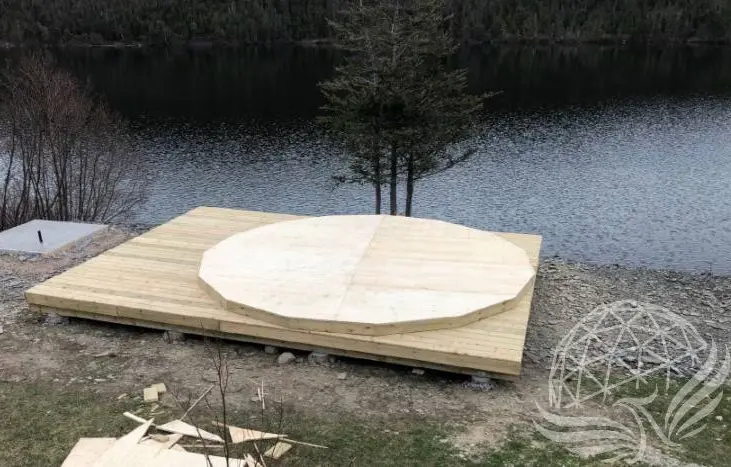
Pourquoi pas une plateforme ronde ?
Un dôme géodésique n’est en réalité pas parfaitement rond ! Recommandé pour nos modèles les plus populaires en 3V, nos tailles courantes comportent 10, 15 ou 20 côtés. Avec une plateforme ronde, la courbure dépasserait entre les connecteurs (hubs), ce qui rendrait l’étanchéité difficile.
Suivez nos plans de plateforme Exact Fit conçus avec précision pour obtenir les meilleurs résultats !
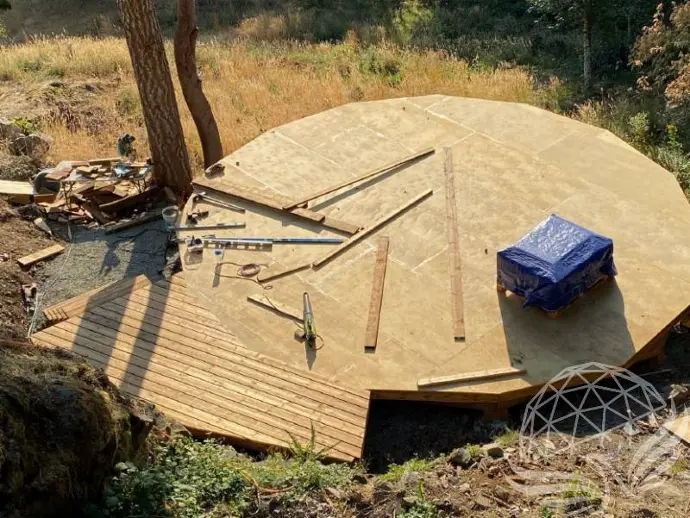
Considérations pour la fondation avec les plans de plateforme ExactFit
Nos plans de plateforme ExactFit sont conçus pour être utilisés avec des blocs de pilier en béton, qui nécessitent un sol ferme et de niveau pour une installation adéquate. Si votre terrain est inégal ou difficile, vous devrez peut-être adapter la fondation en conséquence :
- Terrain en pente : utilisez des poteaux sous les coins de la terrasse pour mettre la structure à niveau.
- Terrain rocheux : envisagez des semelles en béton coulé pour une stabilité accrue.
- Sol meuble : les vis de fondation offrent une base sécurisée et ajustable.
Pour des recommandations adaptées à votre site, consultez un constructeur local ou un ingénieur afin de garantir la meilleure fondation possible pour votre dôme.
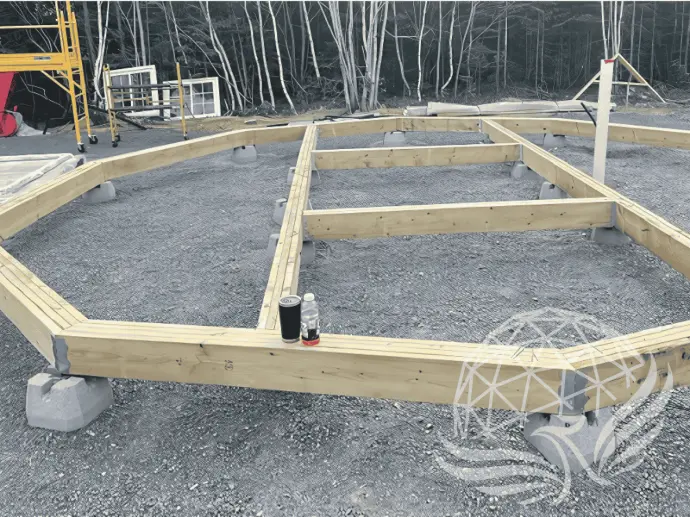

Plateformes en bois
Avantages :
- Élévation et polyvalence : Les plateformes en bois peuvent être surélevées, ce qui les rend idéales pour les terrains inégaux ou en pente. Cette flexibilité permet d’installer votre dôme à divers endroits sans nécessiter de préparation intensive du sol.
- Impact environnemental : Les plateformes en bois ont un faible impact sur l’environnement, car elles peuvent être construites avec des matériaux issus de sources durables et être démontées si nécessaire.
- Accessibilité : Surélever la plateforme peut également faciliter l’accessibilité, en offrant un point d’entrée facile à votre dôme.
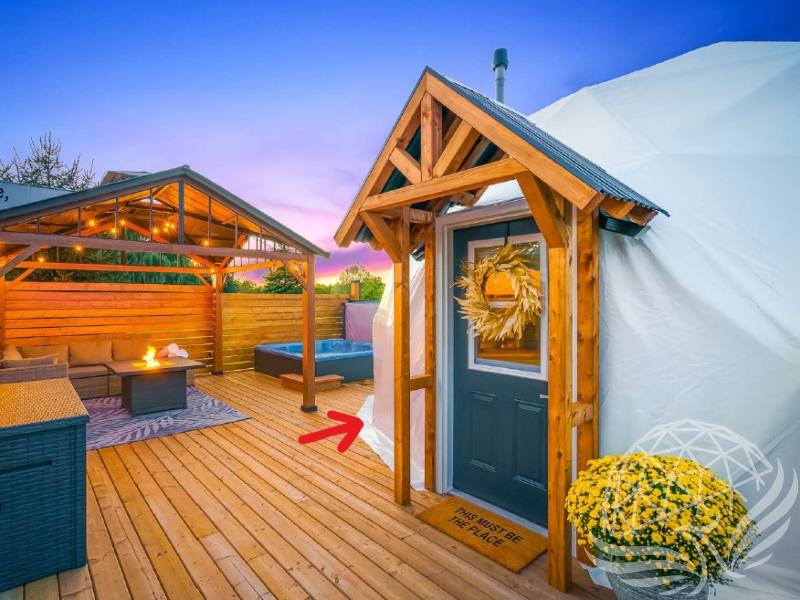
Terrasses rectangulaires
Qu’est-ce qui ne va pas sur cette photo ?
Rien, pourriez-vous penser – cela ressemble à l’aménagement parfait d’un dôme de luxe !
Cela semble être une excellente idée d’avoir une terrasse plus grande autour de votre dôme pour pouvoir en faire le tour à pied et avoir un coin salon, comme sur cette photo.
Cependant, cela peut entraîner certaines complications en matière d’étanchéité et d’isolation. De plus, le bois de terrasse est coûteux, alors pourquoi le gaspiller sous le plancher de votre dôme ?
L’isolation du plancher est également un facteur important – sans isolation, votre dôme ne sera utilisable que trois saisons au maximum.
Terrasses rectangulaires
Qu’est-ce qui ne va pas sur cette photo ?
Rien, pourriez-vous penser – cela ressemble à l’aménagement parfait d’un dôme de luxe !
Cela semble être une excellente idée d’avoir une terrasse plus grande autour de votre dôme pour pouvoir en faire le tour à pied et avoir un coin salon, comme sur cette photo.
Cependant, cela peut entraîner certaines complications en matière d’étanchéité et d’isolation. De plus, le bois de terrasse est coûteux, alors pourquoi le gaspiller sous le plancher de votre dôme ? L’isolation du plancher est également un facteur important – sans isolation, votre dôme ne sera utilisable que trois saisons au maximum.
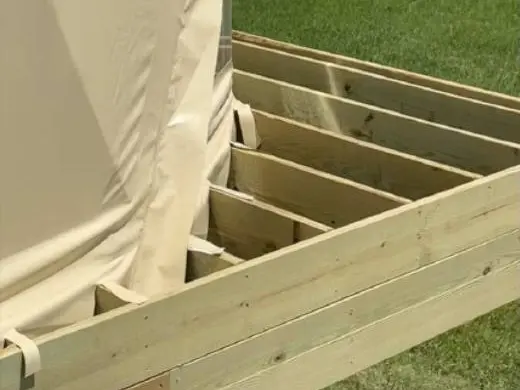
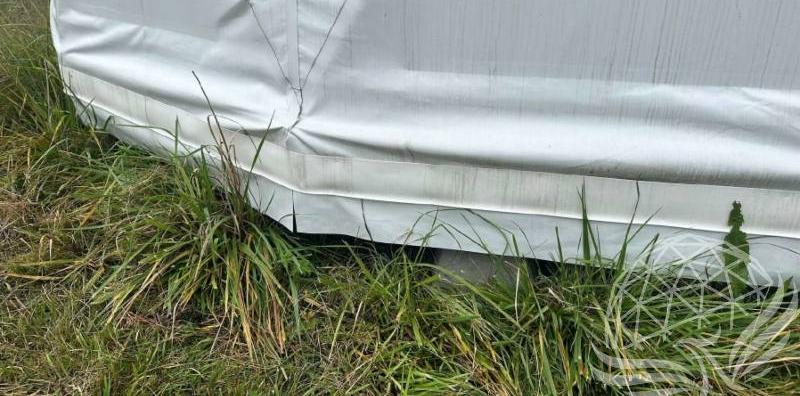
Nous déconseillons fortement de simplement poser un dôme sur une terrasse rectangulaire. L’eau risque de s’infiltrer sous les bords, ce qui peut entraîner de la pourriture, de la moisissure, des infestations d’insectes et d’autres problèmes. Voici quelques façons d’éviter ces désagréments:
- Au strict minimum, découpez un espace périphérique dans la terrasse afin que l’eau de pluie puisse s’écouler vers le bas sans pouvoir pénétrer dans le dôme, et glissez la jupe de la toile dans cet espace du mieux possible.
Prévoyez une meilleure étanchéité dès le départ :
- Construisez votre grande structure de terrasse, puis installez un sous-plancher en contreplaqué selon les dimensions de nos plans Exact Fit.
- Isolez le sous-plancher par le dessous en ajoutant du blocage et de l’isolant, ou en appliquant une mousse isolante projetée.
- Coupez la jupe du dôme pour qu’elle puisse être glissée entre les solives, et ajoutez idéalement une membrane d’étanchéité sur les solives aux endroits où l’eau s’écoulera du dôme.
- Ensuite, posez les lames de terrasse jusqu’à l’extérieur du dôme, en laissant un espace de drainage pour l’eau.
- Ce n’est pas une solution parfaite, car l’eau continuera de ruisseler le long des solives lorsqu’il pleut, mais au moins elle ne pourra ni s’infiltrer dans le dôme, ni stagner sur la terrasse – ce qui est bien préférable aux infestations de mille-pattes, à la pourriture et à la moisissure que nous avons pu constater sous une toile détrempée...

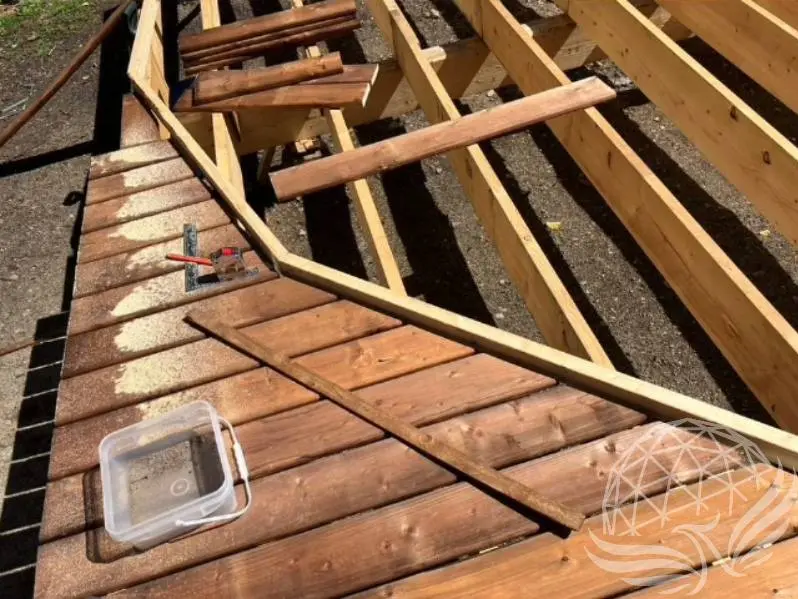
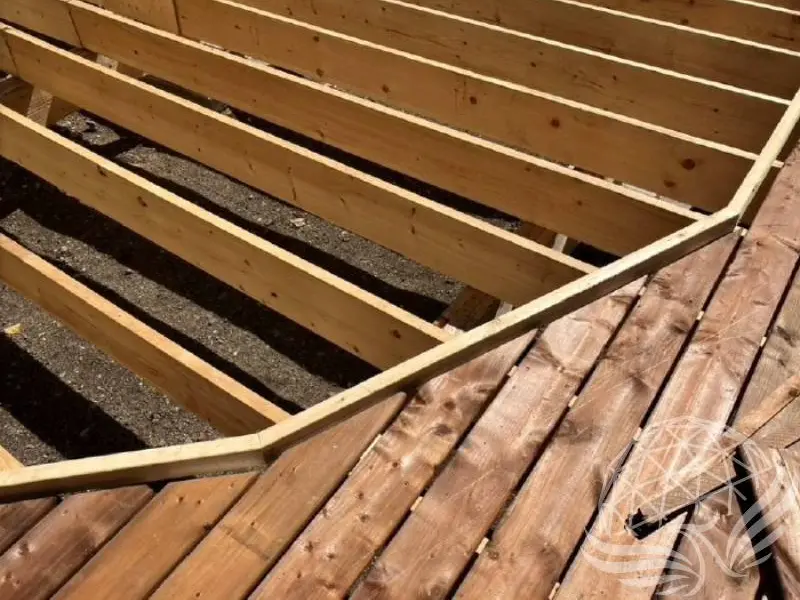
Construisez à partir de la terrasse :
- Commencez par construire votre grande structure de terrasse, puis ajoutez uniquement la structure supérieure des solives selon les plans Exact Fit – en incluant l’isolation et le contreplaqué supérieur.
- Ne gaspillez pas de lames de terrasse coûteuses sous la plateforme – du contreplaqué 3/8 po suffit amplement !
- Idéalement, laissez un espace de drainage autour de la plateforme Exact Fit afin d’éviter l’accumulation excessive d’humidité sur la terrasse.
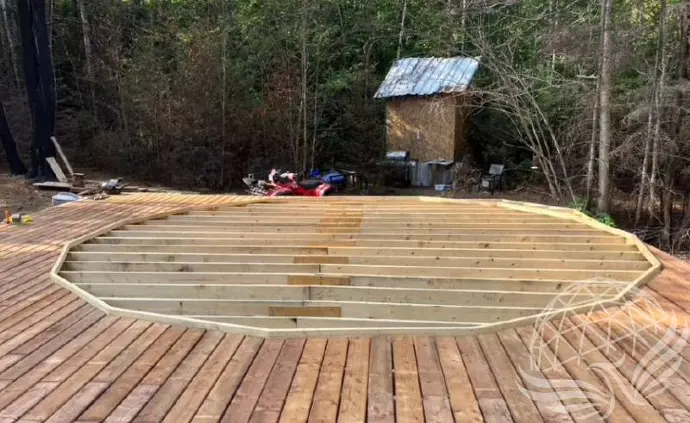
Plancher du dôme intégré à la terrasse :
- C’est une autre méthode possible – la structure des solives est intégrée dans la terrasse, simplement légèrement surélevée – mais n’oubliez pas l’espace de drainage pour que la jupe de la toile puisse y être glissée!
Plus de photos pour illustrer cette option :
Construisez votre terrasse de détente là où vous en avez besoin
Il se peut que vous n’ayez besoin d’une terrasse ou d’un porche que d’un seul côté du dôme – une terrasse faisant le tour complet entraîne souvent un gaspillage d’espace (et de bois coûteux) dans des zones peu utilisées.
Construisez simplement la terrasse là où vous en avez besoin après avoir installé la plateforme – et encore une fois, n’oubliez pas de laisser un espace de drainage (non visible sur la photo) pour permettre l’écoulement de l’eau de pluie.
Imperméabilisation de votre dôme
Commencez par agrafer la jupe de la toile sur le bord extérieur de votre plateforme Exact Fit. Avec la fenêtre panoramique amovible, il ne faut pas agrafer la jupe sous la fenêtre. Vous pouvez appliquer un ruban velcro autocollant pour assurer l’étanchéité tout en gardant la possibilité d’ouvrir. Nous avons trouvé qu’un type de garniture en PVC en rouleau (comme le Shur Trim Wall Base de Home Depot) est utile pour les bords extérieurs et intérieurs du dôme. Vous pouvez l’agrafer ou le visser, puis calfeutrer les trous de vis.
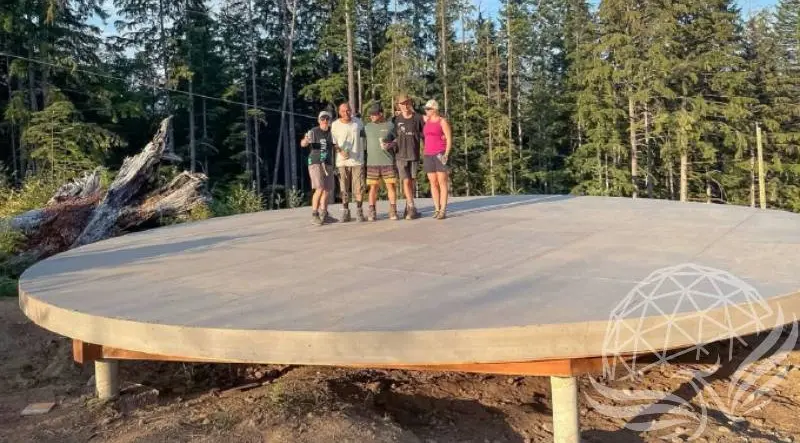
Dalles de béton
Un certain nombre de clients ont opté pour des dalles de béton, souvent avec un chauffage radiant intégré au sol. Cela peut être plus économique compte tenu du prix du bois, et constitue sans aucun doute une option durable et confortable.
Pour créer votre coffrage en béton, partez de nos plans de plateforme Exact Fit, en utilisant les mesures du périmètre et les angles de coupe. Utilisez les mesures du côté COURT de vos planches plutôt que celles du côté long. De cette façon, votre dalle de béton aura les mêmes dimensions que la plateforme en bois. Tous les services (électricité, plomberie, chauffage) peuvent être intégrés directement dans la dalle.
Pour l’ancrage des boulons, vous utiliserez des boulons d’expansion à travers les supports du dôme. Il peut être utile de prévoir un drainage périphérique autour du dôme (gravier, etc.) afin de permettre à l’eau de s’écouler loin de la structure.


Conseils de construction :
- Plans Exact-Fit : Nous proposons des plans de plateforme en bois ajustés (Exact-Fit) gratuitement pour nos tailles de dômes les plus courantes, disponibles sur la page Resources de notre site web. Pour des besoins plus précis, des versions tamponnées par un ingénieur sont disponibles à l’achat pour les dômes de 6 à 11 m, spécifiquement pour les provinces de l’AB, BC, NB, NS et ON.
- Imperméabilisation : La construction d’une plateforme ajustée facilite l’étanchéité de la jupe de la toile du dôme ainsi que l’installation de garnitures de finition autour des bords. Cela permet d’éviter l’accumulation d’eau de pluie et les infiltrations dans votre dôme ou votre sous-plancher.
Options de revêtement de sol alternatives
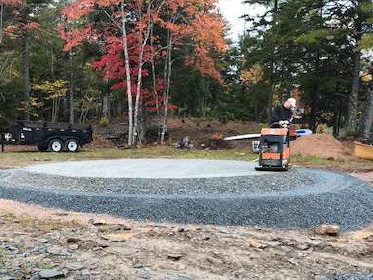
Sols en gravier:
- Drainage : Les sols en gravier offrent un excellent drainage et sont relativement faciles à installer. Ils représentent une option économique qui fonctionne bien dans de nombreux environnements.
- Isolation : Bien que les sols en gravier soient efficaces pour le drainage, il est recommandé d’ajouter une couche de plancher isolée à l’intérieur du dôme pour améliorer le confort thermique.
Sols en terre battue / cob :
- Esthétique naturelle : Les sols en terre battue ou en cob offrent un aspect rustique et naturel qui s’intègre parfaitement à l’environnement.
- Durabilité : Ces matériaux sont écologiques et peuvent être provenant de sources locales, ce qui réduit l’impact environnemental global de la construction de votre dôme.

Sols en béton coulé :
- Durabilité et stabilité : Les sols en béton sont très durables et offrent une fondation solide et stable pour votre dôme. Ils sont particulièrement adaptés aux installations permanentes.
- Chauffage radiant : Envisagez d’intégrer un chauffage radiant dans votre dalle de béton pour un confort accru, surtout dans les climats froids. Cela peut grandement améliorer l’habitabilité du dôme en hiver.

Considérations supplémentaires
Drainage et isolation :
- Espaces de drainage : Si vous souhaitez une grande terrasse plate autour de votre dôme, assurez-vous de prévoir des espaces de drainage suffisants pour éviter l’accumulation d’eau autour du périmètre.
- Planchers surélevés et isolés : Pour de meilleurs résultats, construisez à l’intérieur du dôme un plancher surélevé et isolé. Cela permet non seulement d’améliorer l’efficacité thermique, mais aussi d’ajouter une protection supplémentaire contre l’humidité.
Plans de plateforme et assistance :
- Nos plans de plateforme ajustés (Exact-Fit) sont conçus pour rendre le processus de construction simple et efficace. Ces plans vous permettent d’obtenir un ajustement parfait pour votre dôme, garantissant stabilité et facilité d’entretien.
- Pour des instructions détaillées et de l’assistance, visitez notre page Resources, où vous pouvez accéder aux plans de plateforme et à d’autres informations essentielles.
En choisissant la bonne plateforme pour votre Phoenix Dome, vous pouvez créer une fondation stable, confortable et respectueuse de l’environnement.
Que vous optiez pour une plateforme en bois, un sol en gravier, en terre battue ou en béton, une planification soignée et une exécution précise garantiront le succès de votre installation.
Explorez nos ressources et commencez dès aujourd’hui à construire la fondation idéale pour votre dôme !